Today we are going to have a look INSIDE nature at the parts of a flower with a fun hands-on science project – flower dissection and pollination.
As Spring sets in, we are all treated to blossoming trees and beautiful flowers.
I’m sure your kids will pick flowers, smell their scent and then give the bouquet to Mom.
Ahh… to receive a handful of wilted but picked-out-of-love blooms is a mother’s delight 😉
We’ve had more than one dinner at our house spruced up with a home-picked bouquet, whether they were the wild orchids growing in the backyard or the dandelions that popped up all around (much to my husband’s chagrin).
With the recent plight of the disappearing honeybees , some plants and flowers are in danger of not being pollinated. So I thought this would be a great opportunity for kids to learn more about the process of how plants reproduce.
Parts of a Flower: A Science Project for Kids
This activity is a peek inside the flower which may be something your child has never had the opportunity to do. It’s similar to our highly popular How Do Leaves Breathe? science experiment in that kids get to see parts of nature that aren’t normally visible.
I’m sure (if you grew up in the 70’s or 80’s) you’ll recall the song “Reproduction” (“where does the pollen go!”) – kinda gets stuck in your head 🙂
This science project will show kids that flowers have both male and female parts and explain how reproduction happens in nature.
Here’s what you’ll need:
• A fresh cut flower or two – try to find one that has a large open bloom where you can see the “insides” and not just all petals. Tulips and daffodils are great choices.
• A small somewhat sharp paring knife
• You may also want a Magnifiying Glass (if you don’t have one, I highly recommend getting one to keep in the house!)
• A cutting board
• Paper towels
• And depending on how messy the kids like to get, be sure to cover their shirt and keep a wet rag close by as the pollen on the flower can leave marks on clothes.
Speaking of pollen — if your child has seasonal allergies, they may want to wear a dust mask so they don’t inhale any pollen.
First, have your kids identify the outside parts of the flower (petals, stem, etc). You can use this printable Parts of a Flower card set (great for older kids) or this printable Parts of a Flower worksheet (perfect for preschool and early elementary ages) to help them become more familiar with the terms.


Once you’ve gone over the outside parts of a flower, we want to cut open the flower.
Carefully take your paring knife and begin at the bloom on the flower — with medium pressure, make a cut into the petals and base and then pull your knife down the flower and continue cutting through the top layer of the stem.


This is a great opportunity to teach older kids about knife skills. If you have younger kids, this is a job for Mom or Dad.
If you want some detailed printables, visit Insect Anatomy for some super worksheets that have all the parts of a flower labeled !


Now begin at the top of the flower and gently pull apart of petals on either side of your cut.
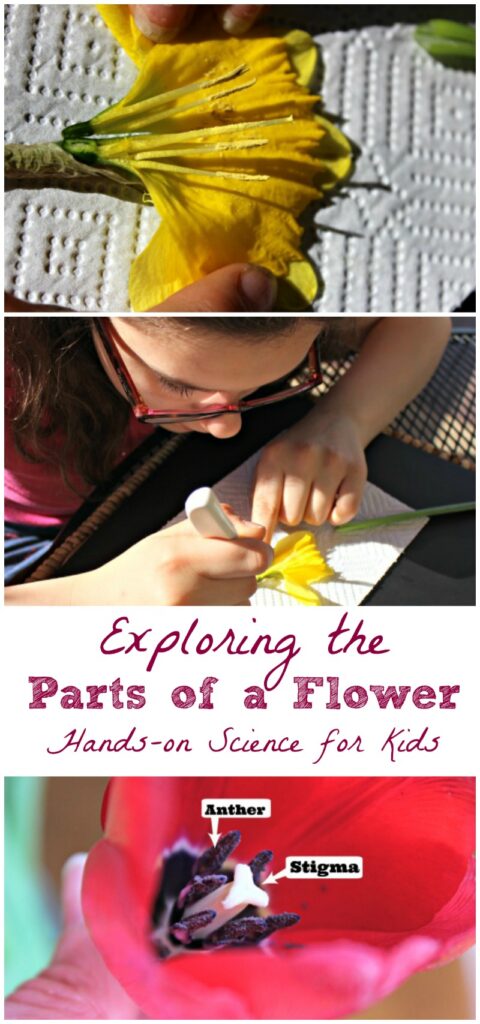
When you first open the flower, you’ll see the male parts which are called the stamen. They are those long tubes and on the ends (the anthers) are where you’ll find the pollen. It looks like yellow powder in our flower.


If you carefully pull back the petals and separate the stamen, you’ll find one long tube in the center — this is the female part of the flower — also called the pistil.
The top of the pistil is called the stigma and is usually sticky. The pistil is usually taller than the stamens.
I’m sure the kids will immediately begin to play with the pollen — it draws them in like glitter. Just be sure to wash their fingers off so they don’t get any in their eyes or near their face when they are done.


Here’s a better look at the anthers and stigma of another flower.
You can see that the anthers look all fuzzy again — that’s the pollen that’s collecting on the tips.
For pollination to take place, the pollen needs to be transferred from the anthers to the stigma.
Now I know what you’re thinking — can you take the pollen from one flower and move it to the stigma of the same flower (basically, can a flower self-pollinate)?
It depends on the plant — for example, these flowers have the male and female parts in the same bloom. But if you’ve ever seen a pumpkin vine grow, you’ll see that the vine produces both male and female BLOOMS. So the pollen from the male bloom has to somehow get to the female blooms in order for a pumkin to begin to grow.
Now this next part is AWESOMELY COOL!


If you look at the base where all the stamen and stigma come together, there is a small buldge in the flower. This is the ovary (yep, another female part).
Carefully peel back the greenery surrounding it and you will reveal the egg cells!! I know — totally cool!!
Even though I magnified the photo above, the kids can easily see them and carefully remove them. This is another great reason to have a Magnifiying Glass!
Science Questions Kids Might Ask:
Do you think bees know it’s their ‘job’ to pollinate flowers?
When kids ask me this question, I tell them that the bees are actually “rude houseguests” – they fly into one flower to eat some necter and their feet touch the pollen that sits on the anthers.
And then, off to the next flower they go for a visit without ever wiping off their feet!
You can laugh but that’s about the gist of it – the bees and other insects track pollen on their legs and feet unintentionally and carry it around to each flower they visit.
Can humans pollinate a flower?
Yes, we can!
All we have to do is transfer the pollen from the anther of one flower to the stigma of another flower.
In fact, some gardens and scientists use this type of pollination technique in order to come up with new flowers or see how some flowers will develop when there aren’t insects to pollinate them.
When my daughter & I were discussing the disappearance of the honeybees, she mentioned that they should create a robot to pollinate the flowers.
Kids these days – those tech ideas come so easy to them!
So we decided to search the internet and lo & behold, someone is actually doing just that!
Harvard School of Engineering is creating Robobees, a robot insect that will help to pollinate flowers.
The things you can learn when kids think creatively!


Books about Pollination
And we couldn’t leave you without a few great books to pair with the project! We’ve included affiliate links so you can learn more about each one and choose the book that best fits your child’s reading level.
The Magic School Bus Plants Seeds: A Book About How Living Things Grow
The Reason for a Flower: A Book About Flowers, Pollen, and Seeds (Explore!)
And for more learning in the garden, try these 23 Free printable Garden Activitites
MORE NATURE PROJECTS FOR KIDS:
30 Gardening Activities for Kids
Create Your Own Nature Notebook (with 50 free printables)
12 Citizen Science Projects for Kids

