Try this cool & easy science project or STEM activity — make a barometer to measure air pressure and weather changes!
With Spring comes crazy weather!
One day it’s raining, the next might bring snow or winds so strong they’ll push you right over.
Like our DIY Tornado in a Bottle experiment, today’s science activity is all about the weather! Kids can use items from around the house to make their own homemade barometer and track air pressure along with weather changes (and try their hand at predicting what the weather will be tomorrow!)
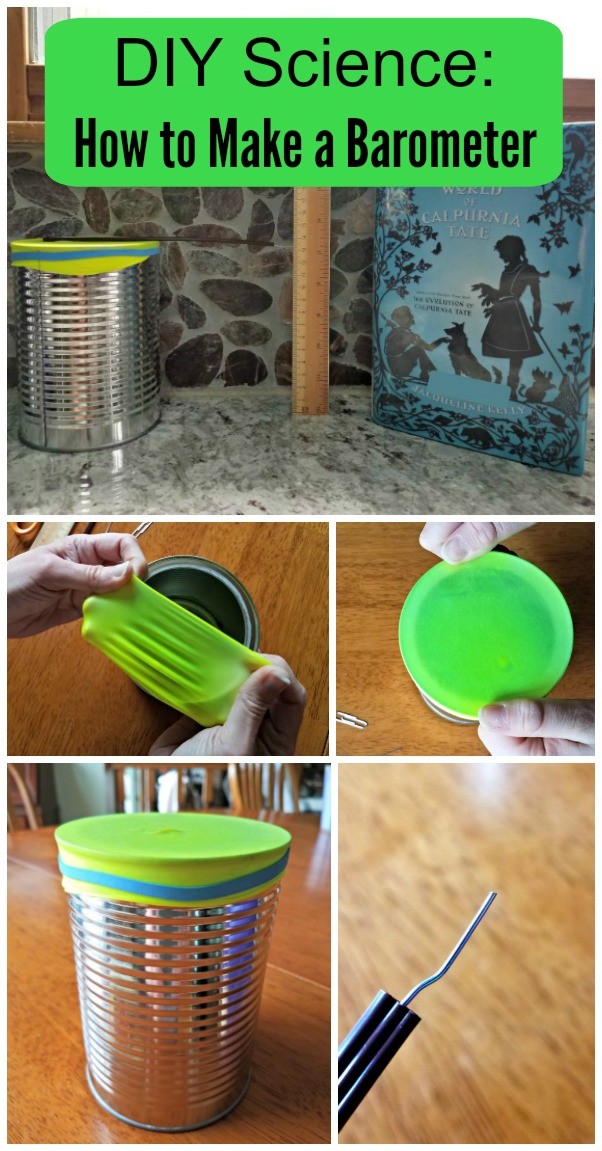
How to Make a Barometer: DIY Science Project
This science activity is part of the month-long Storybook Science series hosted by Inspiration Laboratories and inspired by a book we read!
The series shares a variety of wonderful picture books & chapter books that link to awesome science activities. I’m including affiliate links to the book we used along with other items that helped us during our experiment too.
This is actually an awesome STEM activity since:
- we will be building the barometer (engineering)
- learning about weather (science)
- and calculating the daily measurements (math)
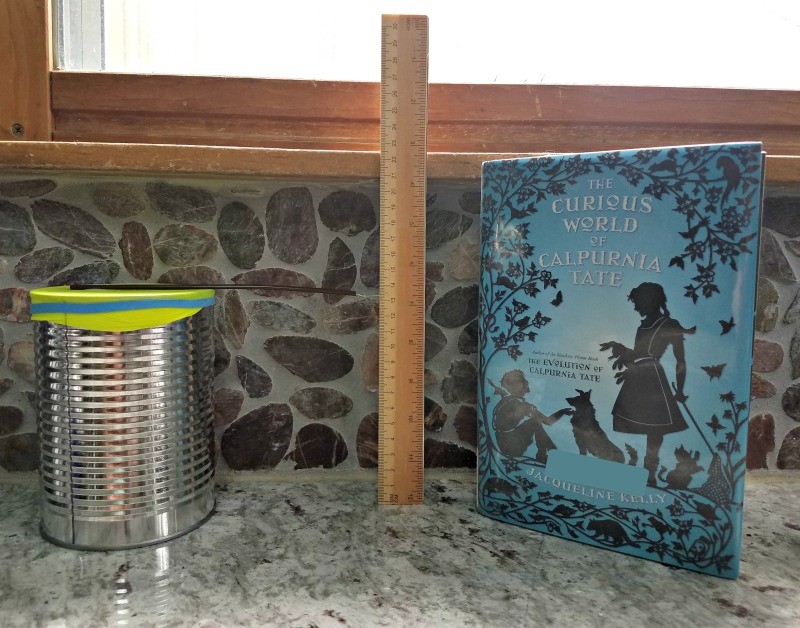
The entire Homemade Barometer project is actually outlined in the wonderful book The Curious World of Calpurnia Tate!
This is the second book in a wonderful historic fiction series, the first being The Evolution of Calpurnia Tate (I hope there will be more but no word on that yet). The books are SO engaging and I highly recommend them as read alouds or for kids ages 8 and up.

In the books, Calpurnia is a young girl who enjoys science, however, she’s living during 1899 & 1900 when girls are encouraged to grow up to be mothers or possibly teachers — but not scientists.
Calpurnia ignores most societal norms and begins to work with her grandfather who is a naturalist and respected scientist. Her grandfather introduces her to all types of science, allows her to use his science tools (like these 10 Awesome Outdoor Science Tools for Kids) and encourages her to journal and track everything.
In this second book, Calpurnia’s Grandfather assigns her the project of making her own barometer so she can collect weather measurements each day.
Calpurnia’s barometer readings and her sighting of a rare bird alert her to report these findings to her Grandfather who promptly informs the weather bureau that a hurricane is coming — the infamous storm that hit Galveston Island in 1900 and considered one of the most deadliest storms in US history!
The book does an AMAZING job of outlining the details for creating a homemade barometer!
From page 30 of The Curious World of Calpurnia Tate:
“Our next lesson involved something called air pressure that you measured with a barometer…. We’ll need a jar, a balloon, a rubber band, a straw, a sewing needle, a metric ruler, and a pot of glue.”
We followed the passage and were able to create our own within minutes — we made a few substitutes (for example, using a paper clip for the sewing needle and a tin can in place of the glass jar) that was used in the story.
I was a little leary about using a glass jar as we were considering placing the barometer outside in an uncovered area (and we have quite a few backyard critters).
I’m happy to report that our tin can barometer works amazingly well!
What does a barometer measure?
A barometer is a weather instrument that measures the changes in atmospheric pressure or air pressure. This is also called barometric pressure.
Air pressure is the weight of air molecules pushing down on the Earth. Since everything within the Earth’s atmosphere is impacted by gravity, even air has weight.
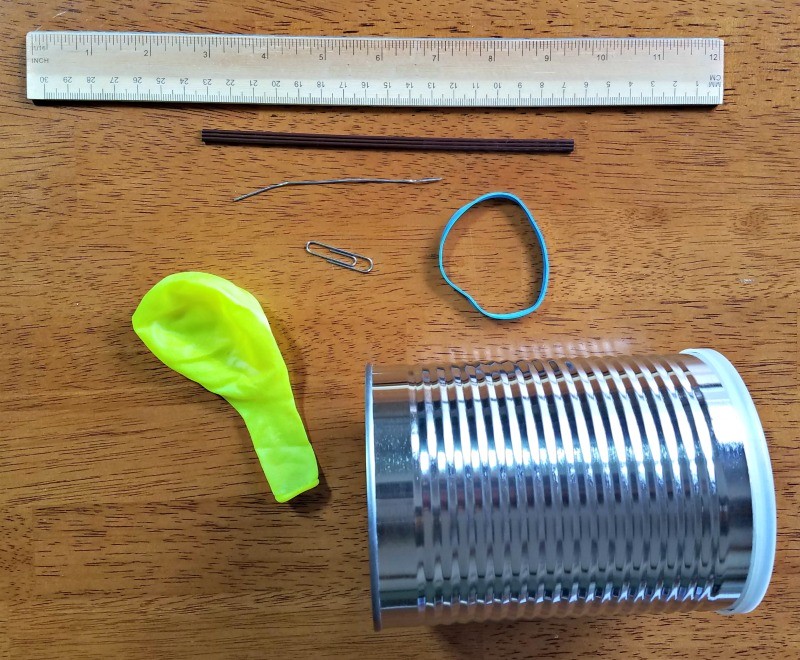
Supplies for a DIY Barometer
Here are the items we used to make our own barometer:
- an empty tin can
- balloons (you may need a few – I’ll explain why below)
- one thick rubber band
- a coffee stirer or thin straw
- a paper clip
- glue
- a ruler with metric measurements
As I mentioned, Calpurnia used a glass jar (similar to what we would know as a mason jar) for her barometer so that can also be used in place of the tin can.
Just in case you or your kids have never seen one, they have a huge variety of barometers on Amazon — some are dials, some are glass jars with mercury, others are digital and they even have barometer apps for your phone now!
You may have one around the house and not realize it.
When I was younger, we had a barometer in one of our fancy lamps in the house (I had NO idea what it was) and my Dad also had one on his fishing boat (which is a very useful place to have a barometer!)
How to Make a Homemade Barometer
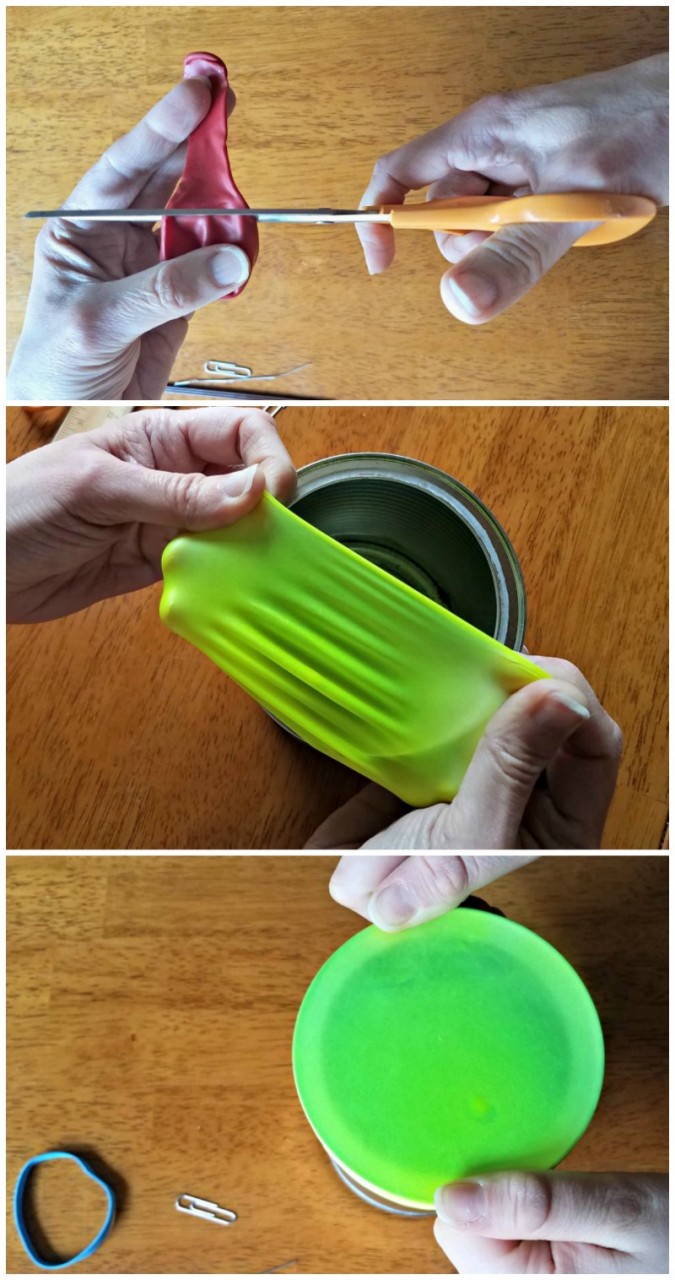
Step 1: Cut the balloon about halfway down (you’ll be using the larger portion of the balloon for the experiment. As you can see, we started with a red balloon but I cut it too low so you may have to use more than one to get the correct sizing.
Step 2: Stretch the cut balloon over the top of the tin can.
Step 3: Secure the balloon using the rubber band so it won’t slip off.
Step 4: Unbend (is that a word) — or straighten the paper clip.
Step 5: Slide the paper clip into the coffee stirer. It should fit in snuggly but if it’s loose, be sure to glue it in place.
Step 6: Glue the coffee stirer to the the center of your balloon so the end with the paper clip is hanging over the edge of the can.
Step 7: Stand your ruler next to your barometer so the paper clip is pointing to the metric side of the ruler.
Step 8: Record the date and the metric unit on the FREE Daily Barometer Record Log we’ve included below!
Step 9: Be sure to put your barometer & ruler is a location where it doesn’t have to be moved while you’re tracking air pressure.
The goal of this science experiment is to see HOW the air pressure changes (increases or decreases) and record any weather changes that occur each day.
Since we are NOT gathering an exact reading, don’t be overly concerned with where your paper clip points on the ruler. Just be sure to record the date & the metric units on the first day you set up your barometer!
How does a barometer work?
A barometer works by showing us whether the air pressure (or atmospheric pressure) is rising or falling.
Atmospheric pressure is an indicator of what type of weather is occuring in your area.
When the barometer readings fall, it indicates low pressure which usually shows in the way of clouds, winds and precipitation (so basically, a bad weather day 😉
When the barometric pressure rises, it means fair weather (or a nicer day!)
With a homemade barometer, the air is captured inside the can or jar once you secure the balloon to the top.
So, as the air pressure outside the can changes, you will see the balloon either rise above the top of the can or sink into the can.
If the air pressure outside of the can is less dense than the air inside the can (meaning air pressure is low), the balloon will expand and the paper clip mark will drop lower on your ruler — low pressure means a better chance for rain and clouds.
Conversely, if the air pressure outside the can is more dense (high pressure), than you’ll see the balloon sink down into the can which will cause the coffee stirer & paper clip to rise higher on your ruler — indicating nicer weather.
Think of it this way — if the air is more dense (high pressure outside of the can), that means the molecules are pushing down on the balloon which causes it to sink into the can.
Weather Experiment: Tracking Air Pressure Changes
When we started our experiment, our barometer reading was approximately 13.2 metric units.
It was fairly cloudy the day we built it and we had some light rain come in during the afternoon.
Using the printable worksheet (get yours below!), kids can track the daily changes and also record their weather observations each day. You can also look online for the actual barometric pressure readings and track those too.
Ok, THIS IS A KEY THING — be sure to write your starting point as soon as you set up the barometer — because this is where kids will see a change and it’s a pretty AWESOME change!
We tracked our air pressure over Spring Break — so a nice, long 9 day cycle for us.
Guess what happened about a week and a half later?
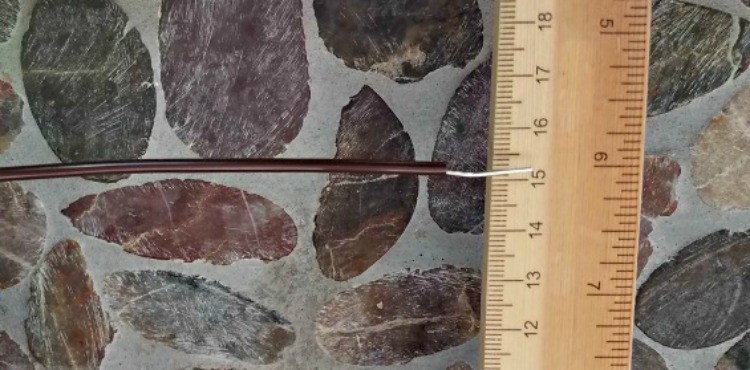
Yep!! It was 15.2 when we moved into some nicer weather!
There were less clouds, the air temperature was warmer and no precipitation.
Of course, by this time the kids were all back at school (Murphy’s Law, right?!)
We didn’t observe any huge jump for readings in one day either.
Each day we looked at our metric unit and would see a small increase (or even a decrease on a few days which was really interesting but of course, once we looked out the window and saw cloudy skies or rain, we knew the barometer was right).
What is Citizen Science?
Citizen science is the term used when every day people like you and I participate in research.
This is an awesome science activity for kids to do on their own and is considered a citizen scientist project since you are collecting & reporting weather data to help others make informed decisions about what to wear or even how to prepare in case of bad weather (similar to the events that happened in the story The Curious World of Calpurnia Tate.)
Have your kids act as Citizen Scientists using this FREE Printable Daily Air Pressure worksheet!
Use the printable to track the changes in air pressure and report it to the family each day — they can help everyone decide what to wear or whether they’ll need to grab an umbrella on the way out the door 😉
There are SO many great Citizen Scientist projects that kids and families can be part of — counting birds that visit your yard, collecting data on bees or ladybugs, tracking the type of cloud or weather changes.
You can see all types of projects and learn how to get involved in this 12 Amazing Citizen Scientist Projects for Kids post!
During a formal citizen science activity, we (non-trained, every day people) would be considered amateur scientists (I love that title!) and assist in collecting data that would be sent to an actual scientist for analysis and reporting.
Be sure to visit Inspiration Laboratories to see all the amazing Storybook Science Activities this month too!! TONS of ways to link books & science together!